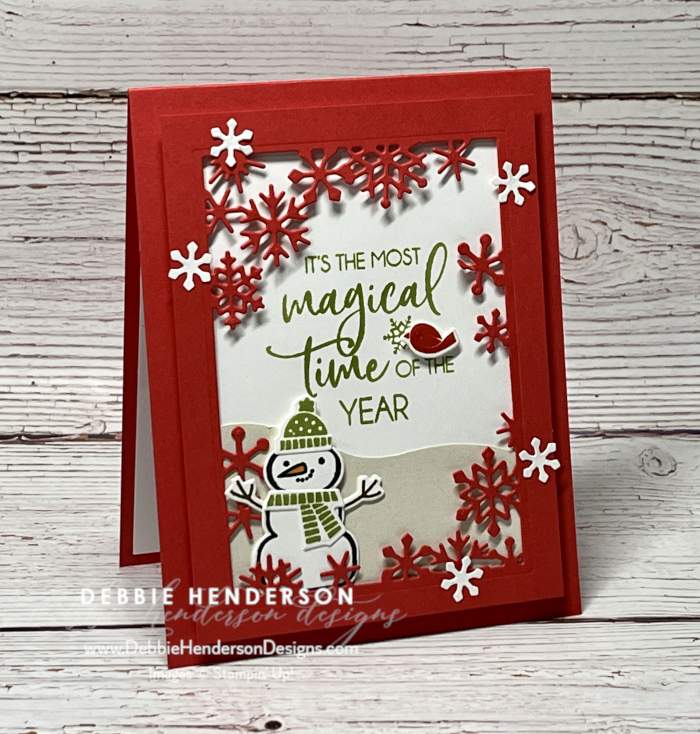
Pretty Diecut Framed Snowflakes!

My inspiration for this card today, is from our Stampin’ Up! Mini Catalog. The card in the catalog is actually bright pink in color and a Shaker Card. I substituted with Poppy Parade Cardstock and opting not to create a Shaker Card. Do you like?


The layer in the center is actually a beautiful diecut from the Snowman Magic Bundle. It’s a framed look where the middle pops out and leaves the pretty snowflakes intact. So pretty! You can add any color to this card and I bet it will be gorgeous. Here’s the how-to:
- Card Base: Poppy Parade Cardstock 11″ x 4-1/4″. Score and fold at 5-1/2″.
- Layer #2: Poppy Parade Cardstock 5″ x 3-3/4″. Use the framed die from the Snowman Dies to cut. Set aside.
- Layer #3: Basic White Cardstock 4-7/8″ x 3-5/8″. Set aside.
- Layer #4: Pearlescent Specialty Paper 3-5/8″ x 2″. Cut the top curvy to resemble a snow bank. Glue to the bottom of the white layer.
- Add Stampin’ Dimensionals to the back of the framed layer. Glue to Basic White layer.
- Sentiment: Stamp the sentiment inside the framed white layer using Pear Pizzazz Ink.
- Snowman: Build the snowman using Tuxedo Black Memento Ink, Pear Pizzazz Ink, Soft Suede Ink and the Light Pumpkin Pie Stampin’ Blends Marker to color the nose. Glue snowman to the bottom left corner using Stampin’ Dimensionals.
- Bird: Stamp the bird image using Poppy Parade Ink and cut with the die. Glue to the sentiment using Mini Stampin’ Dimensionals.
- Snowflakes: Cut out (5) snowflakes with the die. Glue to frame.
Stampin’ Up! Products Used:
- Stamps: Snowman Magic
- Inks: Tuxedo Memento Black, Poppy Parade, Pear Pizzazz, Light Pumpkin Pie Stampin’ Blends Marker
- Cardstock: Poppy Parade, Basic White, Pearlescent Specialty Paper
- Tools & Accessories: Stampin’ Dimensionals, Mini Stampin’ Dimensionals, Snowman Dies,


Leave a Reply